
Monday, December 12, 2011
3 steps forward...
...5 Steps back. The other day while working on the bike I was standing behind it taking a look at her ass end and I noticed something wasn't right. Something wasn't right with the shocks. They looked a little cocked or twisted. I think something got a little crooked during the install and I didn't notice till now. Well, lesson learned. NEVER finish weld ANYTHING until EVERYTHING is THOROUGHLY checked and rechecked. So this is where my bike stands right now...
 ...not to F'ING happy!!! (SAD FACE)
Monday, November 28, 2011
Been a while
Okay...so WOW it's been a while. Well work has kept me away for a VERY long time. Basically spent the past 2-3 months in Vermont so I needed a couple weeks to recuperate and get my ducks in a row again. But I've been hard at work on the bike and have a few updates to make so here goes...
I apologize for the poor photos. My camera died and had to use the phone on my camera instead.

First off....THE BIKE ACTUALLY RAN!!!! Yeah that's right she turned over and she sounds fierce...a bit wheezy but still FIERCE!!! One of the pistons was working a bit harder than the other so I checked the carbs out and there are some issues I need to work through there (read "I need to order floats").

I was successful in officially mounting my tank after many many trips to the hardware store. Had to install 1.5" coupling nuts into the neck gussets and back bone but it should prove to be rock solid. I also have rubber grommets in there so that the vibrations from the engine wont shake the damn thing apart.

I needed to basically remake the entire caliper retaining bar. The previous owner had something on there that looked like it had been run through a trash compactor about 3 times and then straightened out. Sort of hard to see in the picture with the shock and tie down strap in the way but you get the idea.

After my Dad visited to help me store the old bike in the basement he helped me out of a bind in how to mount the lever arm mechanism for the rear brake. It was quite ingenious and I was able to get the parts for free seeing is how they came off unused parts from the old bike. Thanx Dad!!!


Even with all the bending the kicker still functions perfectly well and the position of it to get the bike started didn't change at all. Job well done I do think so myself.
Those are the major accomplishments thus far on the bike. I still have the seat, lights, fenders, carbs, wiring, and final touches to go but at least I'm making progress once again. Well that's it for now, stay tuned.
I apologize for the poor photos. My camera died and had to use the phone on my camera instead.

My temporary makeshift wiring harness.
First off....THE BIKE ACTUALLY RAN!!!! Yeah that's right she turned over and she sounds fierce...a bit wheezy but still FIERCE!!! One of the pistons was working a bit harder than the other so I checked the carbs out and there are some issues I need to work through there (read "I need to order floats").

One good reason to be single. No one to yell about the carburetors on the kitchen table.
I was successful in officially mounting my tank after many many trips to the hardware store. Had to install 1.5" coupling nuts into the neck gussets and back bone but it should prove to be rock solid. I also have rubber grommets in there so that the vibrations from the engine wont shake the damn thing apart.

I needed to basically remake the entire caliper retaining bar. The previous owner had something on there that looked like it had been run through a trash compactor about 3 times and then straightened out. Sort of hard to see in the picture with the shock and tie down strap in the way but you get the idea.

After my Dad visited to help me store the old bike in the basement he helped me out of a bind in how to mount the lever arm mechanism for the rear brake. It was quite ingenious and I was able to get the parts for free seeing is how they came off unused parts from the old bike. Thanx Dad!!!

The next bit of business was the kick starter. Due to the new pipes that I had made for the bike the kick starter was not actually able to fold up fully. It hit the pipe and because of this the end of the kicker actually sat in the sensitive part of the back of my knee. I wasn't too keen about this and it just didn't look good. So what's a guy to do? That's right...break out the blow torch and bend the crap out of it...heh heh!!!

Now it doesn't hit the pipes and wont gouge me in the back of the knee while riding.

Even with all the bending the kicker still functions perfectly well and the position of it to get the bike started didn't change at all. Job well done I do think so myself.
Those are the major accomplishments thus far on the bike. I still have the seat, lights, fenders, carbs, wiring, and final touches to go but at least I'm making progress once again. Well that's it for now, stay tuned.
Monday, August 8, 2011
Happy Hoe!!!
So the first thing one of my co-workers tells me this morning...."I've got a hoe for you in my car!"
Much to my dismay I got all excited and worked up for nothing. He had a friend that broke his gardening hoe and asked if I would fix it for him. He also told me the man had a sense of humor so I figured I'd have a little fun after welding the two pieces back together. Here's the result.

Well after that was done I had the welder all set up and roaring to go I decided to do a little fab work on the bike afterwards. You should read that as "I got in a groove and lost all track of time and normal body function like eating and the need for water while sweating profusely."
Anyways, TC Brothers forward controls are now mounted. Have a gander.


And as you can see the new custom fiberglass seat pan is all fabbed up. Still not mounted however. Here are a couple photos of the progress it went through. Sorry there aren't more but that fiberglass resin sets up QUICK with no time for photos.


Much to my dismay I got all excited and worked up for nothing. He had a friend that broke his gardening hoe and asked if I would fix it for him. He also told me the man had a sense of humor so I figured I'd have a little fun after welding the two pieces back together. Here's the result.

Isn't it a happy lil' hoe?
Anyways, TC Brothers forward controls are now mounted. Have a gander.

Front quarter vew.

Left side view. Don't look at other side, the linkage isn't connected to anything.
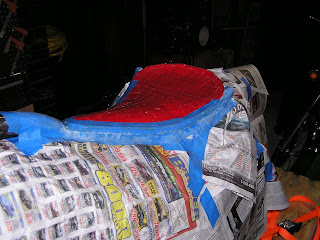
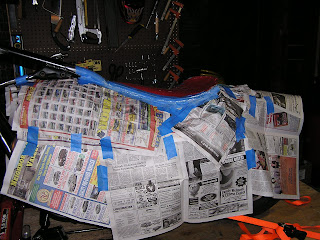
And as you can see the new custom fiberglass seat pan is all fabbed up. Still not mounted however. Here are a couple photos of the progress it went through. Sorry there aren't more but that fiberglass resin sets up QUICK with no time for photos.

Must cover everything around the mold so I don't get resin on the bike.


First four layers have been applied.
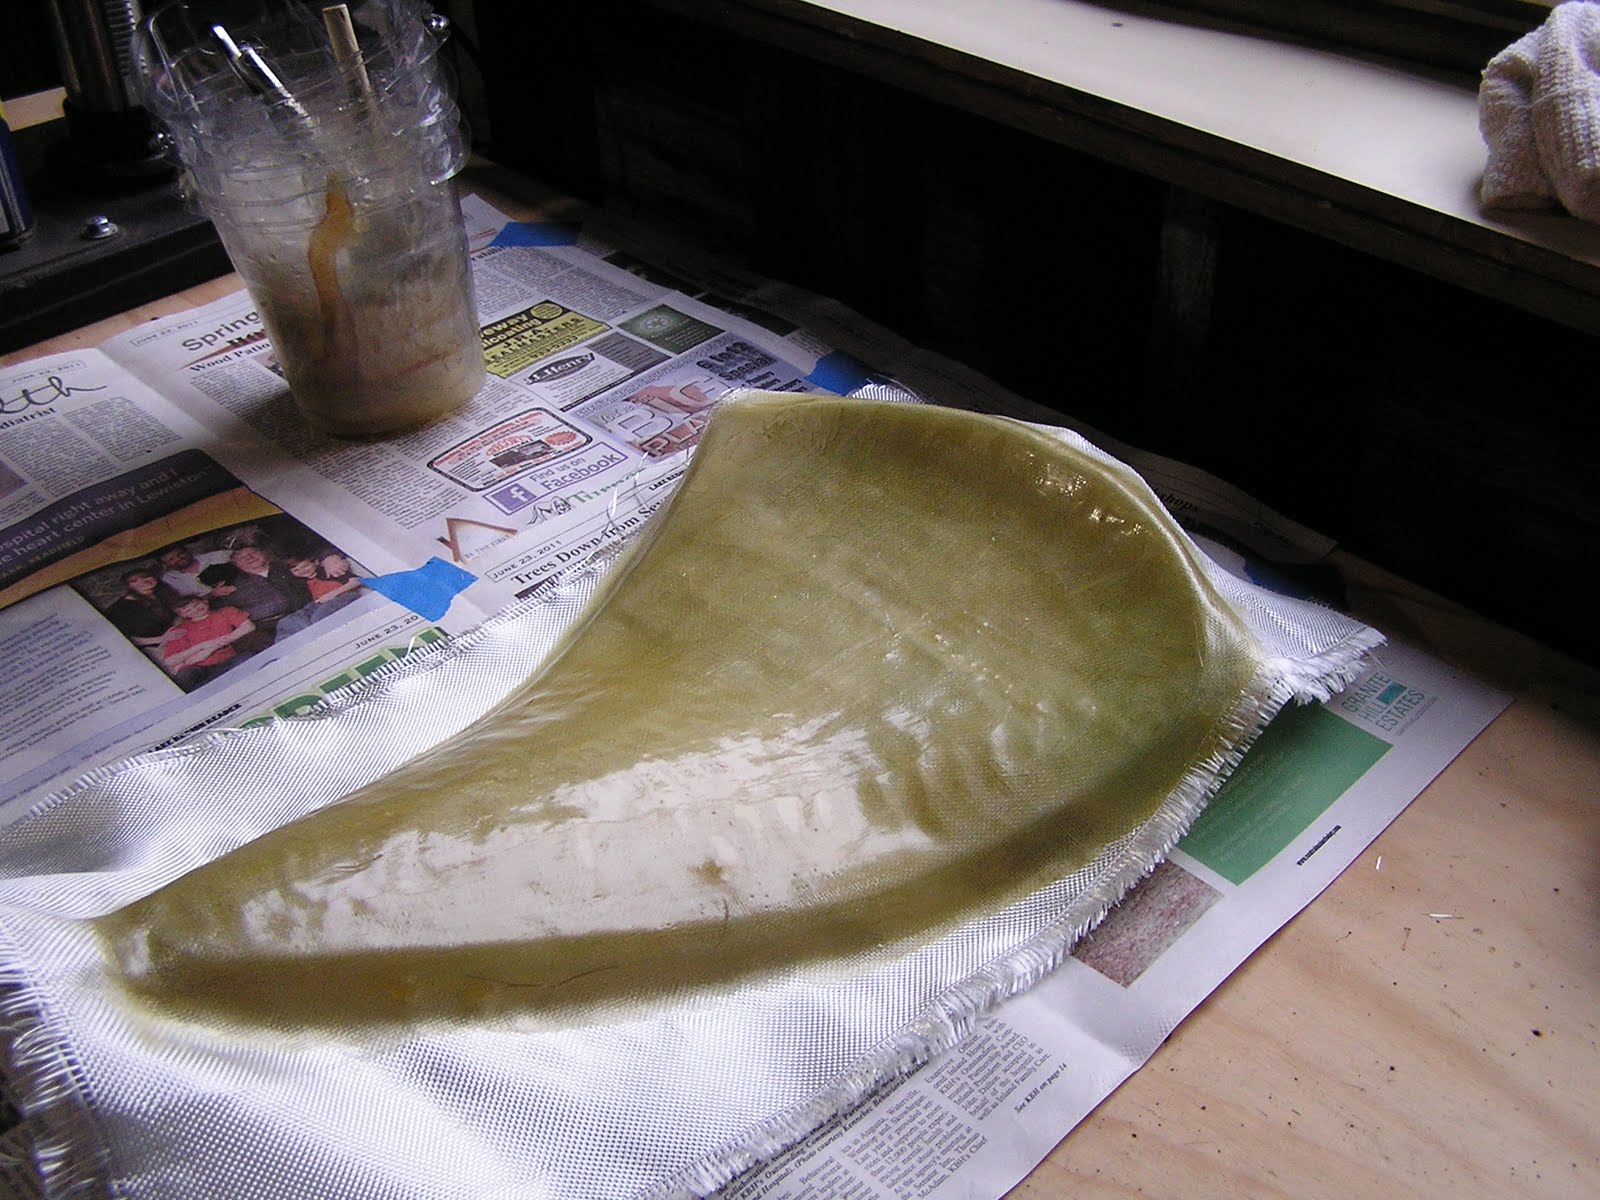

Close up of the finished product. Still needs one light coat of resin though. So not COMPLETELY finished.
Anyways. So there you have it. Wont be doing much more work over the course of this week. I've got to go UPTA CAMP!!!
Saturday, August 6, 2011
I love Duct Tape!!!
Alright, so before I go into the biggest news of all I need to talk about my love of duct tape. While seemingly random this post does tie into building my motorcycle build.
After installing the Visual Impact Brat Kit onto my frame I realized shortly that the Sportster seat the bike came with would not work out. I browsed online but the more I browsed the more I realized it would be VERY difficult to find a custom built seat pan that would fit the style of my bike without looking out of place. Therefore I came to the conclusion I would need to build a custom seat pan myself. Well besides the fact I have no metal molding tools, even if I did my experience in that world is VERY lacking. What's the next best thing? FIBERGLASS!!! The do it yourself best friend!!!
In order to do the fiberglass however I would need a mold to form the glass around. Wait for it....here comes the Duct Tape love.
I cut out some cardboard and laid it on the frame to get an idea. Man did I EVER get an idea. What was originally meant to be a 30-45 minute job ended up lasting for 3 hours this morning. Half a roll of duct tape, 2-3 cereal boxes, and a USPS shipping box later this is what I've come up with....


THAT'S RIGHT!!!! My pipes came in and they F'ING SWEET!!! OH....I think I just pee'd myself a little!!!!
After installing the Visual Impact Brat Kit onto my frame I realized shortly that the Sportster seat the bike came with would not work out. I browsed online but the more I browsed the more I realized it would be VERY difficult to find a custom built seat pan that would fit the style of my bike without looking out of place. Therefore I came to the conclusion I would need to build a custom seat pan myself. Well besides the fact I have no metal molding tools, even if I did my experience in that world is VERY lacking. What's the next best thing? FIBERGLASS!!! The do it yourself best friend!!!
In order to do the fiberglass however I would need a mold to form the glass around. Wait for it....here comes the Duct Tape love.
I cut out some cardboard and laid it on the frame to get an idea. Man did I EVER get an idea. What was originally meant to be a 30-45 minute job ended up lasting for 3 hours this morning. Half a roll of duct tape, 2-3 cereal boxes, and a USPS shipping box later this is what I've come up with....

So that's my mold. I've got to lay down 4-6 layers of glass, add some closed cell foam custom fit to rear end, then lay some fabric across it and TA DAA!!! I've got a seat.
Now without further delay here's the biggest news for this post....I can hardly contain myself so here's a photo. It's MUCH more explanatory....


THAT'S RIGHT!!!! My pipes came in and they F'ING SWEET!!! OH....I think I just pee'd myself a little!!!!
Thursday, August 4, 2011
Two updates.
Just a couple of updates today. First, Gordon Scott Engineering shipped my pipes today which means they will be on my doorstep this Saturday. Can you say "EXCITED!!!!"
Second, I decided to modify the ugly, clunky, gaudy, neck gussets on my bike. I could have bought some plate steel and cut new ones out but didn't feel VERY comfortable welding them to the neck of the bike. So I decided to cut, grind, and weld the existing gussets to more of my liking. Lets just say it turned out to be QUITE the process. Probably would have been easier to cut the old ones out, fab up some new ones, and weld them in. Well it's all part of the learning process I suppose. So here we are....
Before....

And after....

Friday, July 29, 2011
Busy morning...
It's been one hell of a busy morning and I'm freaking exhausted after starting all this at 8am and finally finishing at noon. So I am going to keep it short. The new scoot has a new ass end. Without further ado....here she is...

Tuesday, July 26, 2011
It's sort of sad
Well...here she is. A shadow of her former self....
 But I suppose that in order to build something great you must first tear it down to the ground. So this is the bare bones stock frame with the ugly junk removed at the rear end the former owner added. It will soon be replaced with the new Visual Impact Brat Kit. But first I need to grind off all the sharp bits, removed unwanted brackets, and possibly install a new neck gusset. So I guess now I'm at the bottom of the barrel. I'm sure it'll be an interesting and fun climb out.
I'll leave you with one last picture of all the bits removed. I'm not sure if you can tell but I think the old XS400 in the background is laughing her ass off at the humiliation the XS650 has just undergone.


I'll leave you with one last picture of all the bits removed. I'm not sure if you can tell but I think the old XS400 in the background is laughing her ass off at the humiliation the XS650 has just undergone.

Sunday, July 24, 2011
Busy little weekend!!!
So I've been a bad boy. I know....I know....I should have been working on the bike this weekend. But I had other plans. I did some calling around and found a great deal on a 60 cubic foot pressurized gas bottle from Maine Oxy. So since I know have a bottle of gas, 50ft 10/3 extension cord, mig gun, work clamp, and a welder to carry around I was in dire need of a welding cart!!! Ta Da.....

 My new welding cart. BAM!!! I know I should have taken intermediate photos but I just got into it and didn't have time for photos. All that's left is to make the studs the welder will rest on so it doesn't actually fall off the cart and then paint the S.O.B and I'm done. Hopefully over the next week I'll actually have a motorcycle build update to post on here. Till then....


Friday, July 22, 2011
Pipes are on order!!!
Just got off the phone with Scott of GordonScott Engineering!!! He got the photos I sent him of my mocked up exhaust and it looks like it will 7-14 days!!! I'm psyched!!! SUPER friendly guy and he comes to my home state to ride all the time. WTF are chances of that? Anyways, here's a picture of what I finally came up with. Final pipes will be much larger in diameter and made of raw mild steel. Once they are in they get a coat of good quality hi-temp paint and fiber exhaust wrap. It's going to look sick!!!


Wednesday, July 20, 2011
It's been a while....
Alright, so it's been a while since my first post. The reason for that is that I've been busy brain storming ideas for the bike so there isn't much to post. I've also been busy collecting (read purchasing) tools that will be necessary for the build. So....let's get to viewing what it is I've purchased over the past week and a half and not talk about the fact that perhaps I went a bit overboard. It might just be white break bologna sandwiches and Ramen noodles for the next week or two until payday ;-) I'm sure I'll survive just fine....
First thing I bought was a compressor. Every good shop needs a compressor for things like inflating tires, cleaning off dust, and up to angle grinding and impact wrenches. Here's what I bought. It was on sale and if I bought the compressor I'd get 25% off air compressor tools and accessories so of course I bought more than a compressor.

 It's a nice little 20 gallon 150psi compressor from sears and an angle grinder with accessories for those tight to reach places my 4.5" DeWalt grinder can't reach. All in all this came out to a VERY reasonable price and am quite content with the purchase.
Next comes the purchase the purchase that will send me shopping for a few packs of Ramen noodles. Should I have bought it only a few days after the compressor?.....probably not. Am I happy I did....if you could see the ear to ear shit eating grind on my face after using it you would know the answer ;-)
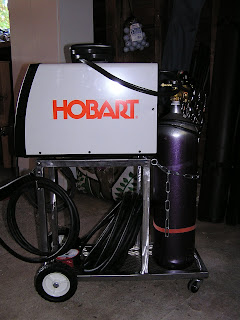
 Yup that's right...I bought a GMAW/FCAW welder! Now the welder, 240 volt extension cord, 2 lb. roll of flux core wire, welding gloves, welding pliers, gas regulator and hose, auto darkening helmet, and heavy weight fire retardant cotton welding jacket came to under the price of the bottom of the line Mill and Lincoln 120 volt welders. The craziest thing is that Hobart was actually purchased by Miller and is quite evident by the fact that the wire gun is a Miller product. I just got in from the garage after using and while flux core doesn't produce the nicest welds the machine performs far above and beyond anything I could have possibly expected. I will happily eat those super salty and crappy tasting noodles for this purchase. And I'll do it with a shit eating grind because I'll be welding in my own garage with a quality welder on my motorcycle.
Now for the ideas and purchase I've made for the motorcycle. First and foremost I bought the Visual Impact Brat Kit for the motorcycle to transform the rear end of the frame into something MUCH more appealing that what it currently looks like. Take a look at their website....Visual Impact Brat Kit. At the top of the page is what comes in the kit for a very reasonable price. If you scroll down you'll see instructions on installation and a couple examples of what it looks like after a finished install. I think it will pretty damn spiffy on the bike. Now while I wont be finish welding the kit on my bike due to the flux core process I have (upgrading to full GMAW will come later) and the fact that my welding skills are not where I would like them to be to weld something my ass will be cruising on at 60mph, I can at least tac it into place so that I can bring it to the welder in town to have it professionally done so I can cruise in comfort.
Now the next item on the agenda is pipes. No I'm not talking about the type your grandfather smokes...I'm talking about the loud, ear splitting, disturbing the peace, piss of my neighbors, exhaust pipes for the bike. I found a man online who makes custom pipes for the XS650 and has a couple different styles available. Here's his web address....Gordon Scott Engineering. Those are his "Curved Drag" pipes and here is what they might look like on my bike....
 Mind you they wont be so small, white, and made out of PVC pipe but you get the idea. So what do you think? I'm not 100% convinced yet. While they look f'ing sexy on the hardtails shown on his site I think they loose some of the sexy on the softail due to the huge ass piece of steel that supports the swing arm and that used to support the foot pegs. What do you folks think? Post in the comment section and let me know.
Well sorry for the wall of text but I had a lot of catching up to do. That's all for now.
First thing I bought was a compressor. Every good shop needs a compressor for things like inflating tires, cleaning off dust, and up to angle grinding and impact wrenches. Here's what I bought. It was on sale and if I bought the compressor I'd get 25% off air compressor tools and accessories so of course I bought more than a compressor.


Next comes the purchase the purchase that will send me shopping for a few packs of Ramen noodles. Should I have bought it only a few days after the compressor?.....probably not. Am I happy I did....if you could see the ear to ear shit eating grind on my face after using it you would know the answer ;-)

Now for the ideas and purchase I've made for the motorcycle. First and foremost I bought the Visual Impact Brat Kit for the motorcycle to transform the rear end of the frame into something MUCH more appealing that what it currently looks like. Take a look at their website....Visual Impact Brat Kit. At the top of the page is what comes in the kit for a very reasonable price. If you scroll down you'll see instructions on installation and a couple examples of what it looks like after a finished install. I think it will pretty damn spiffy on the bike. Now while I wont be finish welding the kit on my bike due to the flux core process I have (upgrading to full GMAW will come later) and the fact that my welding skills are not where I would like them to be to weld something my ass will be cruising on at 60mph, I can at least tac it into place so that I can bring it to the welder in town to have it professionally done so I can cruise in comfort.
Now the next item on the agenda is pipes. No I'm not talking about the type your grandfather smokes...I'm talking about the loud, ear splitting, disturbing the peace, piss of my neighbors, exhaust pipes for the bike. I found a man online who makes custom pipes for the XS650 and has a couple different styles available. Here's his web address....Gordon Scott Engineering. Those are his "Curved Drag" pipes and here is what they might look like on my bike....

Well sorry for the wall of text but I had a lot of catching up to do. That's all for now.
Thursday, July 14, 2011
And so it begins....AGAIN!!!
So here is the new toy I bought a couple days ago via a very generous graduation present. A new 10 amp, 10k rpm DeWalt grinder. Why do I need such a grinder you might ask?

This is why I need said grinder. A 1979 XS660 engine mounted in an already slightly modified 1980 XS650 frame, fitted with a a Harley Sportster tank and seat.

However it did not start life this way. The original owner turned it into a hardtail bobber of sorts shown in the next photo.

He tried to sell it and couldn't get what he wanted for it. Then the decision was made to try and make it into a softtail bobber in the hopes that a family member would join him in his joy of the open road. Turns out that didn't work so I bought it off him for $600. The deal included an extra seized parts engine, additional set of front forks, stocker parts off of a doner bike, and various other assorted parts.


So this will be my journey into turning the bike into something along the lines of this...

Part of this journey is going to somehow turn the rats nest of this wiring harness....

into something a little bit neater, smaller, and easier to understand and work with. So come join me on a journey I'm sure to be filled with tear, laughs, and whole lot of shit eating grins. I'll leave you today with a few more pictures of the bike as it stands at day one.


Subscribe to:
Comments (Atom)